


Artwork Preparation
The following guidelines are provided to assure that you get good results. If you have questions about these requirements you can request additional information by email or read our blog where we write longer articles explaining some of these concepts.
General Artwork Standards
- PDF is the standard file type which can be created from Illustrator, InDesign, Word and Publisher.
- Ensure that your PDF is at 300 DPI resolution. Higher than this is unnecessary.
- Do not include crop marks, registration marks or additional file information in the margins.
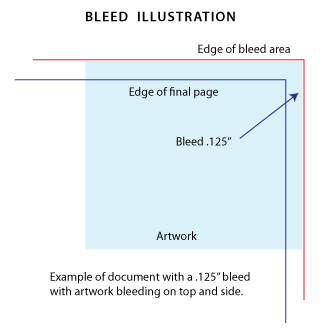
- Allow a .125″ bleed zone on all outer edges of the artwork.
- Outline fonts (convert to vector) or embed them in the document.
- Flatten artwork with layers prior to generating your PDF file or specify flattening in the Acrobat output settings.
- Each job (including multiple paged projects) must be submitted as a single PDF file.
- Ensure that all pages are the same size.
- Files must be submitted with proper orientation, especially important in double-sided documents and folded pieces such as brochures.
- Include all important artwork within the Safety Line – approximately .185″ from the trimmed edge.
- It is best to avoid using borders in your design. If a border is too close to the trim line it may be slightly off-centre.
- PMS colours should be converted to CMYK in your artwork. We do not print individual spot colours. For colour critical artwork, it is advisable to request a hardcopy proof so you can adjust colours appropriately.
- Convert your work to a US Web Coated (SWOP) 2 or Coated GRACol 2006 colour profile if colour accuracy is important.
- If you are designing it yourself, calibrate your monitor to assure that the colours you see on screen are as close as possible to what you are printing.
- If you are embedding photos in your artwork, reduce the size to 300 DPI in Photoshop or other program beforehand or set the Acrobat downsampling to 300 DPI for any files over 450 DPI.
- It is advisable that you convert photos to a CMYK colourspace in Photoshop or other editing software and then include them in your design. The conversion usually affects the colour and brightness and will require further adjustments.
- If your job includes folds, specify the fold type and which panels are on the front and back of the finished item.
- If your item is being die cut, provide the original artwork and a second file with just the die line. Do not combine the two in one file.
If artwork does not meet these requirements the following may occur:
- your files will be rejected and you will be required to make corrections.
- you can request that we fix errors, assuming that we have editable files available. In these cases we will charge for out time at a rate of $55/hr.
- we can proceed to print (assuming the errors do not prevent this). This is generally limited to issues related to colour and not design. In these cases, you will be required to confirm that we are to print.
Design for Banners
There are additional design requirements for banners which also apply to most large format print jobs. Please review these and adjust your artwork as required.
Be sure to DELETE any hidden layers that are not intended to print (ie: setup guide layers or other hidden artwork layers) to ensure no risk of them appearing on the final print.
Files must be submitted with proper orientation to ensure proper back up. Please review the File Orientation Guides carefully in the File Prep tabs for your particular product.
It is best to try to avoid using borders in your design. If a border is too close to the trim, the trim may be slightly off-center.
Ensure that your PDF is high res and that all images are CMYK at 300 DPI.
All type must be outlined (not embedded).
Please provide vector only artwork for type, logos, shapes and all other artwork. Only provide embedded raster artwork for actual 4/C images.
Black text/type should have the following values: C0, M0, Y0, K100.
Larger areas of black coverage should be C:30/M:20/Y:20/K:100 to get a deep richer black.
If you select a White Ink option with your order, please supply a single file that includes CMYK (if necessary) and a spot colour called exactly White_Ink. Do not supply separate files for CMYK and White Ink. If you want white ink to print under a blue colour, you need to set either the blue shape or the White_Ink shape to overprint to achieve this. You may also want to set a White_Ink shape to knockout so nothing prints on top of it. Remember to set overprints on any Dieline.
If you select Black Only option on your order, the file you supply should be K only (not CMYK or RGB) with a Dieline and/or White_Ink spot colours depending on your order specifications.
Thin White Text on Rich Black Backgrounds
While SinaLite maintains strict quality standards, minor shifts in printing are possible. Thin or small white text knocked out from a rich black background is prone to printing issues, such as color bleeding, filling in, and poor readability due to slight misregistration. We recommend preparing files with the following tips in mind.
Use C30 M20 Y20 K100 for Rich Black
Use this recommended rich black formula to minimize oversaturation and registration problems. Avoid heavier CMYK builds like C60 M60 Y60 K100, which can increase color shift risks.
Thicken White Knockout Text
Increase the thickness of white text knockouts to prevent them from filling in or becoming unreadable.
Recommended minimum line weight: 0.75pt
Recommended minimum font size: 8pt
Apply Swelling
Swelling (slightly enlarging knockout areas) compensates for minor ink spread on the press. Slightly increasing the size of the white knockout text can help maintain crispness after printing.


You must be logged in to post a comment.